I was determined to find another project at the thrift store the other day.
Why? I have no idea since I have a box full of things waiting to be repurposed.
My Halloween decorations had not found there way out of the box yet since I was still enjoying the arrival of fall!
So as I shopped at the Goodwill inspiration arrived….
Here is how to make a cute inexpensive Halloween sign.

(Please excuse the nails if the wall, to eager!)
Do you know what it is was in a prior life?
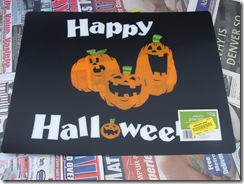
Yep, a plastic placemat. And 0.49 cents at that.
Then I set out looking for a frame.
Can you believe that someone got rid of this needlework?
I hope you heard the sarcasm!
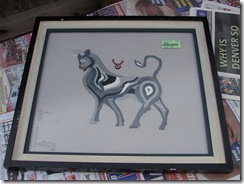
I splurged more than I usually do on a thrift store frame and bought this one for $5, because it was a perfect fit (top to bottom, that is).
I have never done a tutorial and this is real basic probably missing some steps in the pictures, but here is what I did.

By the way, genealogy is another love of mine and I find old family pictures, bibles, and such very interesting.
So as I flipped this picture over, it told a story.

Apparently Eva Wilkins from Pittsburg, PA visited Colorado in 1973 and bought this for Ernie and Rosemary Vetter. I suppose this is the story as I found it in a Colorado Goodwill here locally and it was made by the artist in Boulder, Colorado.
Anywho! On to the transformation.


These are some wonderful things that help with all my thrift store finds in realizing there full re-purposed potential.
(who knows where they have been, ewwww!)
I minimized my cutting by finding a frame that fit the placemat top to bottom, so I only have to cut an inch off of each side.
I didn’t put a back under the placemat because it changed the white letters and made them darker. I preferred the leaving it so that it could be more translucent if I ever wanted to hang in front of light source or window.
I nailed my mine right against the placemat on the inside of the frame you could also use nails and bend them over to secure it.

Now this is temporary decor and up out the way of little hands so the picture is hung by a a wire that came on the back of the frame. It does not hang from the ribbon! There is a tiny nail for the ribbon to rest on and hey, the bow isn’t even attached it just rest on the nail :)
Super easy!
If you want to see other great creations from talented people check out the places I party:
Metamorphosis Monday at Between Naps on the Porch
Power of Paint at Domestically-Speaking
Twice Owned Tuesday at Creating a House of Grace