Showing posts with label Little One. Show all posts

Wednesday, March 14, 2012

Green Playdoh

Pin It

We needed some gifts for our play group’s St. Patrick’s party that we were going to.  I wanted for the children’s gift to be something that my 2 year old would love to help make.

After a little Pinterest inspiration, I decided that homemade green playdoh would be perfect for a bunch of little ones.

Playdoh2

I knew I didn’t have time for a full rainbow, but the green playdoh would be a great way to make our first batch in the time frame we had.  I decided to use Meet the Dubiens' Kool-Aid Playdoh recipe. 

I figured completely edible, but might not taste so great. 

I was right!

I had everything in the pantry except some Kool-Aid.  So I picked up some Lemon Lime Kool-Aid mix.

Playdoh Kool-Aid

Follow the recipe just as I did here.

To package it cute for our party, I bought these cute little canisters for $0.99 at Michaels.

Playdoh 

Playdoh1

Then a little green shredded packing and cute ribbon to create the perfect little Green St. Patrick’s Day Playdoh.

Playdoh3

I’m Sharing Here:

Living Life Intentionally

Thursday, March 1, 2012

Ruler Growth Chart

Pin It

No doubt you may have seen this somewhere before. I found my inspiration on Pinterest. They were PB knock-offs. Truth be known, when I found the PB original, I preferred the knock-offs! They were cuter and more rustic looking, in my humble opinion.

Growth

So, I set out to get my wood and make a memory for our family.

  • Buy a nice smooth finished 1x8 6ft. board.
  • Next stain the board the color of your choice (mine is Minwax Provencial).
  • After your stain dries, place a sawtooth picture hanger on the back top center of the board.
  • Hang on the wall where you would like.
  • Using a tape measure, measure from the floor up on your board (while it is hanging on the wall) and mark the first inch where the tape meets the board and each inch up to 1 foot.
  • Next take the board off of the wall and lay on floor or flat surface to make your work easier. Line your tape measure back up and continue to mark each inch and foot mark throughout the entire board.
  • Then paint your lines and numbers. (I used a ruler to have straight lines and a Sharpie oil based paint marker. I marked each inch mark 1.5 inches long and each foot mark 3 inches long. Lastly, I added the numbers with a stencil.)
  • Then re-hang your ruler and to avoid it being loose, moveable, or swinging on the wall place a 3M command Velcro fastener to the back on each side.
  • The ruler is accurate and can be used while hanging. To mark a child’s growth you can write on the board with a Sharpie on the front, side, or back.

Growth2

It is my new favorite 1 year old gift to give our friends with a small toy, of course.

Where I’m sharing:

Skip To My Lou

Under the Table and Dreaming

Tip Junkie

Night Owl Crafting

Lil Luna

House of Hepworths

Bear Rabbit Bear

Just a Little Creativity

Living Life Intentionally

Chic on a Shoestring Decorating

My Repurposed Life

Lolly Jane Boutique

Fingerprints on the Fridge

Positively Splendid

Adventures of a DIY Mom

I’ve been featured here:

Hookin' Up with House of Hepworths


HookingupwithHoH

Wednesday, February 29, 2012

Train Table

Pin It

We have officially entered our train phase! 

We contemplated a train table this past Christmas, but didn’t think we were ready yet.  My how things change quickly with a little one growing.  We suddenly are ready and run around the house singing “Chuggington…..” and yelling “Ride the Rails.”

I found a blog after wasting some time on Pinterest that I really liked.  Lindsay at Country Girl Home.

First, I found her entry and loved it knowing it was exactly what I wanted (more to come on that later).  As I began to wander around her blog I found the cutest train table that she built her little ones. 

So I am not proud or always innovative, just crafty!  Why fight something that you already like, right?

Here is our version.

Train Table before

We built the frame very similar.

Our wood buy list:

2 – 2x4 8 ft. long (doubled up and used for legs, because cheaper than 4x4)

2 – 1x4 6 ft. long (for frame)

1 – 2ft. x 4ft. 1/4 inch smooth finished plywood

Train Table2

The table was built by screwing 2 2x4’s together at the top and the bottom as shown in the pictures above.  I then turned the screws to the inside of the table and screwed each side of the frame to the legs with two screws just as the arrow shows in the picture above.  I made sure to drop the top of the legs 1.5 inches inside the frame to allow for a lip on the table when completed.

Then I took a pencil sketched some flowing  lines to paint a road, lake, river, and hills.

Acrylic paint from Michael’s and a foam brushes made this so much easier than it was in my mind.  I sealed the top with a satin varnish in the same acrylic paint line.  I am so glad that I did this to withstand the wear of trains and cars as well as making the table top wipeable!

Then to place the top on the table frame, it was simply set inside the frame with Liquid Nails placed on the top of the legs to hold it all together.

Train Table overhead

I have been shocked how much attention this little table gets and how much fun it gives!

Train Table after

Where I’m sharing:

Skip To My Lou

Under the Table and Dreaming

Tip Junkie

Night Owl Crafting

Lil Luna

House of Hepworths

Bear Rabbit Bear

Just a Little Creativity

Living Life Intentionally

Chic on a Shoestring Decorating

My Repurposed Life

Lolly Jane Boutique

Fingerprints on the Fridge

Positively Splendid

I’ve been featured here:

Just a Little Creativity


Thursday, November 3, 2011

Thanksgiving Thumbprints

It is busy around here between Halloween, Little Guy’s Birthday, and Thanksgiving….then straight into Christmas and New Years.  No wonder everyone feels the bustle.  But after birthday and Halloween, I wanted to switch gears for little guy and begin focusing on Thanksgiving and giving him something to look forward to and appreciate. 

Thumb print

So as soon as the Halloween decorations were down, we need a craft that incorporated something more than pumpkins.

Since we are still little and not completely independent (or mom isn’t completely afraid to let him make a huge mess), we like to do thumb print art.  He can also help with paper punches and turn his art work into something a little cuter.

A turkey it is!

Thumb print turkey

Isn’t he cute?  And little guy is so proud!

A new word, a new holiday, new experiences and memories.  This is going to be so much fun.

Linky parties I love and hope you will visit too:

Living Life Intentionally's TGIF

Bear Rabbit Bear's Things I've Done Thursday

Sharing Saturday with Crafty Moms Share

The Sunday Showcase "Child Centered" with Mom to 2 Posh Lil Divas

Wednesday, October 26, 2011

Pumpkin Patch Fun

We had so much fun going to the Pumpkin Patch!

Every year we go to a true pumpkin farm and pick pumpkins from the fields.  There are so many fields that you truly can get away from crowds.  Last year we went just prior to our little guy beginning to walk so he sort of propped on pumpkins. 

Now we run and laugh making the pumpkin patch so much fun!

,mn b

Pumpkin Patch Collage

Pumpkin Patch Gazing

Sunday, October 23, 2011

Mickey Mouse Birthday Party

Pin It

It has been busy lately getting ready for our first real birthday party.  Last year our little guy’s first birthday was celebrated with mommy, daddy, grandparents (via Skype), and a large cupcake! 

This year was going to be a small event! 

I knew it was going to be a Mickey Mouse themed party and began searching for ideas because I knew it was going to be homemade as opposed to the limited commercial products available.  So here it is!
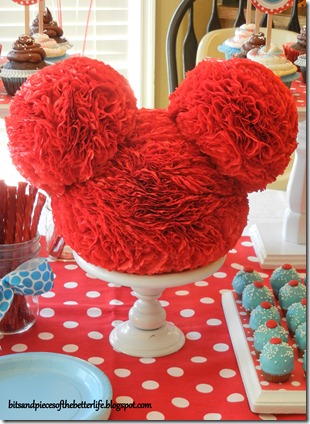
2 Birthday Centerpiece

The centerpiece was one of those inspiration pieces that I found here at Shay Bocks.  I decided to take the general idea, but adapted the technique to something that worked best for me.  Tutorial to come soon….

The entry was decorated to greet our guests with balloons and a sign that I made with paper and a spray painted dollar tree frame.

2 Birthday Entry

The sign said….

2 Birthday Sign

My little guy loves to say things are “big, big” .  Smile

2 Birthday Table

The other great inspiration that I found…..

2 Birthday Cupcake Collage

The cupcake stands were from Bee in Our Bonnet.

The chocolate cupcake and vanilla cupcake recipes were found at Our Happy Medium.  Thank goodness I found these recipes that were delicious and perfectly adjusted to work at altitude!

2 Birthday Bottle Collage

Paper straws in milk bottles was a great idea that I had seen somewhere in the past.  I had to improvise, and decided that Frappuccino bottles were perfectly within budget.  The bigger kids actually loved the straws and drinking from the bottles.

The candy coated cake ball cupcakes were adapted to color coordinate from Bakerella's Cupcake Bites.

2 Birthday Banner

A birthday banner made on my computer.

Script was a free download “Walt Disney Script v4.1”
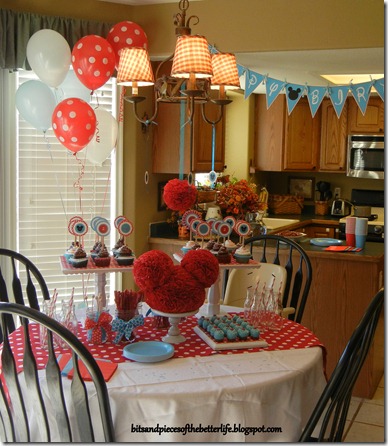
2 Birthday Light Fixture Distance

What do you do with a light fixture.  Well, that is a craft fail story….I originally tried to cover it with a drum type shade that I made, but without some more reinforcement to keep it’s shape, I could not make it work.  I would have been better off trying to cover each shade, but I was out of time so the next best option….

2 Birthday Light Fixture

I had extra cupcake toppers and a pom ball, so improvise with some coordinating ribbon to hang from the light fixture to incorporate it, but not hide it. 

Great last minute solution.

As favors for our guests I put together a bag of little goodies.

2 Birthday Favor Bags

I kept it simple with white lunch bags, blue ribbon, and red tissue paper.

Inside the bags….

2 Birthday Favors

A bottle of homemade bubble solution for “Big, Big, Fun”

A Mickey Mouse bubble wand made from a black pipe cleaner

Extra pipe cleaners for some wand creations

A bag of animal crackers with a Mickey Mouse topper

Mickey Mouse stickers

A Mickey Mouse coloring sheet with a Thank You for coming to Matthew’s Party

Mickey Mouse crayons (markers for the older children)


And to share why this celebration means so much to us…
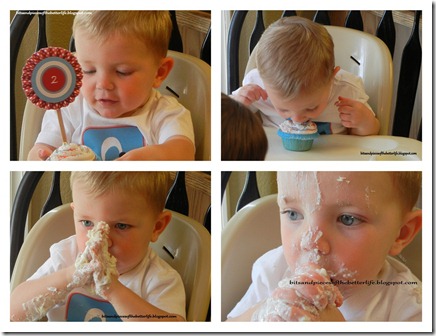
2 Birthday Boy Collage

Our little blue eyed charmer is now “2”!!!

A celebration like this deserves more partying, so…you can find me here:

The Girl Creative

Skip to My Lou Made By You Monday

Craft-O-Maniac

Under the Table and Dreaming

Tip Junkie's Tip Me Tuesday

A2Z Home Stories

The Frugal Girl's Chic and Crafty Party

Sugar Bee Crafts' Take-A-Look Tuesday

Night Owl Crafting's Hoo’s Got Talent

Blue Cricket Design's Show and Tell

Lil Luna Link Party

Hookin-Up with HoH

The Shabby Creek Cottage's Transformation Thursday

Chic on a Shoestring Decorating's Flaunt it Friday

My Re-Purposed Life's Catch as Catch Can

The Shabby Nest's Frugal Friday

Fingerprints on the Fridge's Feature Yourself Friday

Fridays on Remodelaholic

Tater Tot and Jello's Weekend Wrap-up

Bear Rabbit Bear's Things I Done Thursday

Whipperberry's Friday Flair

Lolly Jane's Whatcha Got Weekend

Be Different Act Normal's Show and Tell Saturday

Designer Garden's VIP Party

Sew Many Ways' Sew Darn Crafty Party

Living Life Intentionally's TGIF Party

I’ve been featured here:

Living Life Intentionally

Tip Junkie

Friday, July 30, 2010

Is there such a thing as FREE?

I have always heard that NOTHING is free in this world. Well, I think the lesson was that of responsibility for actions…cause there is such a thing as FREE.

View Details

I admit that I like to watch Oprah and always have. It is great that during the summer they air re-runs so that I can see a well liked show again or catch a show that I may have missed. Well, yesterday they aired a show about freegans. Who knew there was a name? Many people were interviewed from thrifty to dumpster divers. It was interesting! You can read more here about freeganism on Wikipedia. Basically it states that freegans believe that we consume too much and waste too much. TRASH! Got my attention, my kind of story. There are many main stream people including a physician and engineer that were interviewed that find the majority of there groceries from dumpsters. Sounds gross, doesn’t it?

View Details

Well actually the eye opening part is that perfectly good food is in the trash. I am not talking about eating what someone scrapped off of there plate into the trash can like you may do at home. Grocery stores and restaurants throw away perfectly good packaged foods that can be pulled from the garbage that are not unsafe. Of course they recommend washing fruit and vegetables at home before consuming, but entire packages of baked goods were thrown away because of “rules” and “it is easier”. (I suppose easier than sorting and marking down or donating to a shelter for good use?)

All of this made me thinking about the recent find that I have had as well as the challenge that it had created for me.

Can I feed my baby for free?

Now wait, I am not talking about dumpster diving for my child. I also am not talking about breastfeeding that is much more acceptable. I am talking about formula for my child that is free and not from any type of assistance program.

Just wanted to get some of the misconceptions out of the way :)

For the love of CRAIG……Craigslist that is!

My baby is eating free. I am not needy, but thrifty and the formula companies always send out samples.

DSC04230

Many people who get these samples though do not have needs for them and list them for free. Of course, I will only use formula that is unopened and originally packaged.

Look what I have for FREE

DSC04232

That is cutting $21 from the grocery bill every week, for several weeks. Together retail this formulas would cost $66. Can you believe that they are sending out full size samples?

They also come with the can for lactose intolerant or sensitive fussy formula. I take those as part of the package deal and then relist them for free to pass the help along.

DSC04233

Everyone that I have received the formula from states that they don’t have a need for it and that if not taken would become TRASH!!!

As I stated before, I am going to challenge myself to see if from now until we are done with formula in the next few months how much $$ I can save by rescuing another’s trash to feed the baby.

Related Posts Plugin for WordPress, Blogger...